Often it happens that once you plug in any external hard drive or insert any new or the old one into your computer, it is not visible to you. Sometimes, the same hard drive is not visible in your PC but is very well detected in other’s computer. This issue is very common and often people resort to various means to get rid of this issue.
There are various reasons for this issue and some of them are-
- Insufficient power supply
- Lack of drive letter
- Outdated drivers
- File system issues
- Partition problems
- Dead USB port
What recourse to be adopted when the external hard drive is not showing up?
- The issue persists in almost everyone’s computer. Sometimes, by doing only a simple trick can solve this problem such as by disconnecting the power supply, so to do this, follow the steps given below-
a. Shut down your computer
b. Disconnect the power cable from your PC or computer and then wait for a few minutes.
c. Reconnect the power cable and restart your computer.
See if the external hard drive is showing or not.
- Next, you can simply disconnect your USB drive and then reconnect it to overcome the issue. To do this, follow the steps given below-
a. Disconnect the USB devices from your computer
b. Restart your computer
c. Reconnect USB devices to your computer
- If still the issue is not resolved then, try updating your USB Device driver because sometimes when the driver is not updated, it showcases such problems and does not detect the hard drive. So, to check the status of the driver and to update it, you have to do the following-
a. Press Windows + R key together and then, type devmgmt.msc in the run dialogue box and click on OK.
b. Expand disk drivers and right-click on the connected external USB drive.
c. Click on properties and select the Driver tab.
d. Click on Update Driver Software and follow all the instructions that are being shown on the screen.
- If the problem is still there, then you need to check Disk Management and see through it. The next step that you need to take is to open Disk Management and check in it. To do this, follow the steps laid down below-
a. Open Windows search by pressing Win+S.
b. Type disk management.
c. Select Create and format hard disk partitions.
d. See into the drives list and check where your external disk is located. If you are able to locate your external hard drive in the Disk Management as unallocated, you can easily fix that issue.
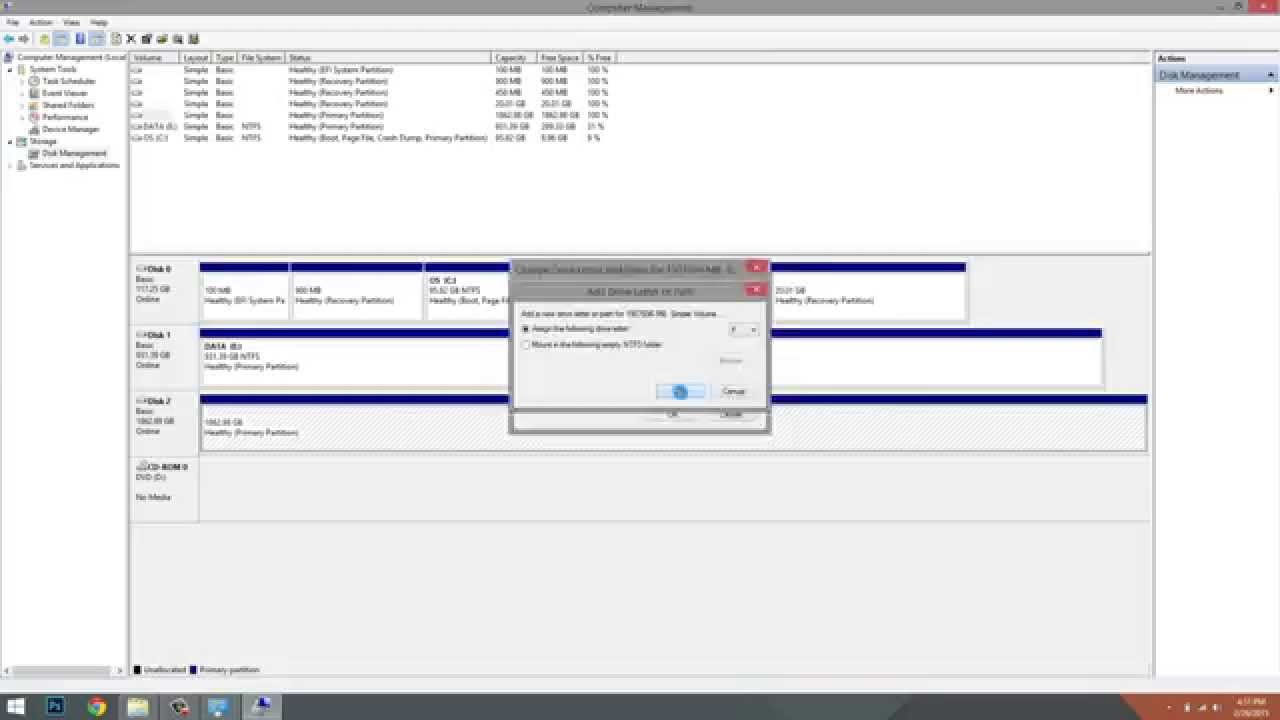
- You can also change the drive letter to deal with the issue. To do this, you need to follow the steps given below-
a. Right-click on This PC or My Computer and click on Manage.
b. Select Disk Management.
c. Right-click on the connected external drives and chooses Change Drive Letter and Paths.
d. Click Add, and then assign a new drive letter from the drop-down list and click OK.Bullock123**
- The next possible fix would be to fix USB Root Hub and then you can easily see the external hard drive. To fix the USB Root hub, you have to go through the following steps-
a. Press Windows + R key together and then type devmgmt.msc and click on OK.
b. Expand Universal Serial Bus controllers.
c. Right-click on USB Root Hub and click Properties.
d. Thereafter, select Power Management and uncheck the Allow the computer to turn off this device to save power checkbox. Click ok and save changes.
Now, you have to repeat the above process for your USB Root hubs that are showing and save changes for each of them. After that, restart your PC. If you still are not able to see the USB device, you need to go back to the power management step and have to see if the boxes again.
- Next possible step is change the USB selective suspend settings to deal with the issue. To do this, you need to follow the steps given below-
a. Go to Control Panel and click on Hardware and Sound.
b. Click on Power Options.
c. Select Change Plan Settings under preferred plans.
d. Click on Change advanced power settings.
e. Expand USB settings and USB selective suspend settings.
f. Select Disable from the drop-down menu.
g. Click “Apply” and “OK” to save the settings.
- You can also run trouble shooter so that if any hidden problem is there, it can easily be resolved through it. To do this, you can do the following-
a. Open Settings.
b. Choose Update and Securityfrom Windows Settings panel.
c. Go to the Troubleshoot
d. Choose Hardware and Devicesfrom the right pane.
e. Click on the Run the Troubleshooter
f. Wait for a few minutes so that the detection is complete.
g. Once the scan is completed, Windows will list the found issues.
h. Choose the issue that you want to fix and then click next and see if the issue is resolved or not.
- Sometimes, the hard drive is not detected because it is not easily detected in the BIOS. For this, you need to enable legacy USB support to get away with the problem. To do this, follow the next steps-
a. Restart your PC.
b. Press the corresponding button to enter the BIOS utility.
c. Shift to Advanced
d. Choose USB Configuration.
e. Select Legacy USB Supportand set it to be Enabled.
f. Exit and save changes.
- If above mentioned any fixes do not lend you any help, then there is a chance that your hard drive has become dead or broken. In that case, you need to contact your data recovery service provider so that he can detect the problem and get the issue resolved. If the problem is resolved, then you are advised to create a back up for the data so that it is not lost if any mishap happens.
Conclusion
It is sure that all the above mentioned steps or a few of them will definitely prove useful in resolving the issue. The external hard drive may not be visible by many such reasons as cited above, but you do not have to worry at all as now, you can easily get done away with the problem by following simple steps mentioned above.